Mini Bunny
free amigurumi-patternby @rxy_crochet
(english in US crochet terms)
Subscribe to my Newsletter to get a FREE premium PDF pattern!

Ears (make 2)
R1: 6 sc into magic ring (6)
R2: (1 sc, inc) x3 (9)
This cute bunny is one of my very first own designs, since i started crocheting.
I have crocheted before but not with that intensity as i do now. I also realized how relaxing this activity is for me. It's almost like meditation, which i also do (more or less) regularly. :D
So, now i am really into crocheting and amigurumi, i feel like i can't live without it anymore. It's a serious addiction... xD
I feel so proud when i finish a toy and it turns out just as i wanted it to. The better i get, the more i can achieve this, as i can really turn the idea in my head into the material object.
Bunnies are one of my favorite animals to make. They are just so adorable and cute and also pretty easy to make.
For this project you will need:
If you are new to crocheting and don't want to buy everything separately, i recommend to get a crochet Starter Kit with the main tools.
Crochet Hook size 4/2.5mm -> my go to and absolute favourite crochet hooks are these Japanese Tulip Etimo Rose crochet hooks. I use them all the time!
Yarn in the color: grey (i used: Schachenmayr Bravo but when you live in the US you can use this substitute)
Yarn strength: 50gr/133m, DK light-worsted, number 3
Scissors or cutter -> if you prefer scissors i can really recommend these beautiful high-quality, vintage scissors
OR: If you prefer a cutter - like me - i really recommend this quick to grab yarn cutter
Stitch markers -> i use these
Yarn needle, embroidery needle -> i recommend get them in several sizes, with a blunt tip (so you don't split the yarn). You will need them very often in amigurumi: the bigger ones for sewing your pieces together and the smaller ones are perfect for embroidery or sewing smaller pieces.
Rosé felt
White, pink or grey sewing-thread
Safety-eyes size 6 -> i recommend to get them in a set with different sizes
Stuffing -> i use this poly-fil stuffing, i recommend getting a larger amount, because in my experience it's used up fairly quickly
R1: 6 sc into magic ring (6)
R2: (1 sc, inc) x3 (9)
R3: (1sc, inc) x3, 3 sc (12)
R4-5: sc around (12)
R5: (1 sc, invdec*) x3, 3sc (9)
R6-7: sc around (9)
R8: (1 sc, invdec) x 3 (6)
R9-10: sc around
Cut yarn, leaving yarn end for sewing ears onto the body.
Body
R1: 6 sc into magic ring (6)
R2: inc into every stitch (12)
R3: (1 sc , inc) x 6 (18)
R4: (2 sc , inc) x 6 (24)
R5-7: sc around
R8: (3 sc, inc) x6 (30)
R9-12: sc around
R13: (3 sc, invdec) x 6 (24)
R13: (3 sc, invdec) x 6 (24)
R14: (2 sc, invdec) x 6 (18)
If you want to add safety-eyes add them now (Size 6mm) between round 7 and 8, 5 stitches apart. If not, you can sew the eyes with black embroidery yarn on later.Stuff the body.
R14: (1 sc, invdec) x 6 (12)
R15: ( invdec) x 6 (6)
Cut yarn leaving an end. With a needle close the hole by going from the inside out into the front loops of the remaining stitches. Pull on yarn-end to close hole. Tie off, hide yarn-end.
Sew ears onto body. With black sewing thread sew the nose as a little x between the eyes, one round down, as shown in the picture.
Sew ears onto body. With black sewing thread sew the nose as a little x between the eyes, one round down, as shown in the picture.
Legs/Arms (make 4)
R1: 6 sc in magic ring (6)
R2: sc around
Cut yarn, leave rn for sewing onto the body. Don’t sew them on yet.

Tail
R1: 6 sc in magic ring (6)
R1: 6 sc in magic ring (6)
R2: sc around
Tie off leaving a yarn end for sewing.
Pink fur-patches
Cut out small pieces of felt as shown in the photo. Sew them on the bunny with sewing thread. I used the running stitch.
Position the arms and legs with pin needles. Now sew on the legs, arms and tail. Tie off and hide yarn ends.
You now have created a cute little bunny! Show me your result by linking (@rxy_crochet) in your Instagram-picture.
*invdec (invisible decrease)
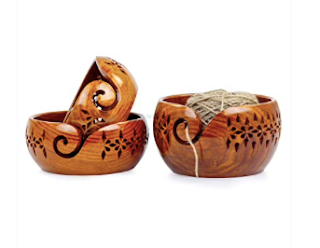
Check out this super practical yarn bowl!
I just got one and it's amazing!
It's heavy enough to not move when i pull on the yarn and no more chasing of yarn that's rolling around in my flat.
PLEASE ALSO READ BELOW
This crochet pattern, as well as all images and text contained herein are copyrighted by Roxy's Crochet. Please, don't copy, sell, reproduce, or distribute them in any way to any other person or entity, or post on any website without linking to this blog. You can sell the final product or products created from this crochet pattern in accordance with your state and local laws, with the exception of mass production. Then also i would be happy if you give credit to me as the designer.