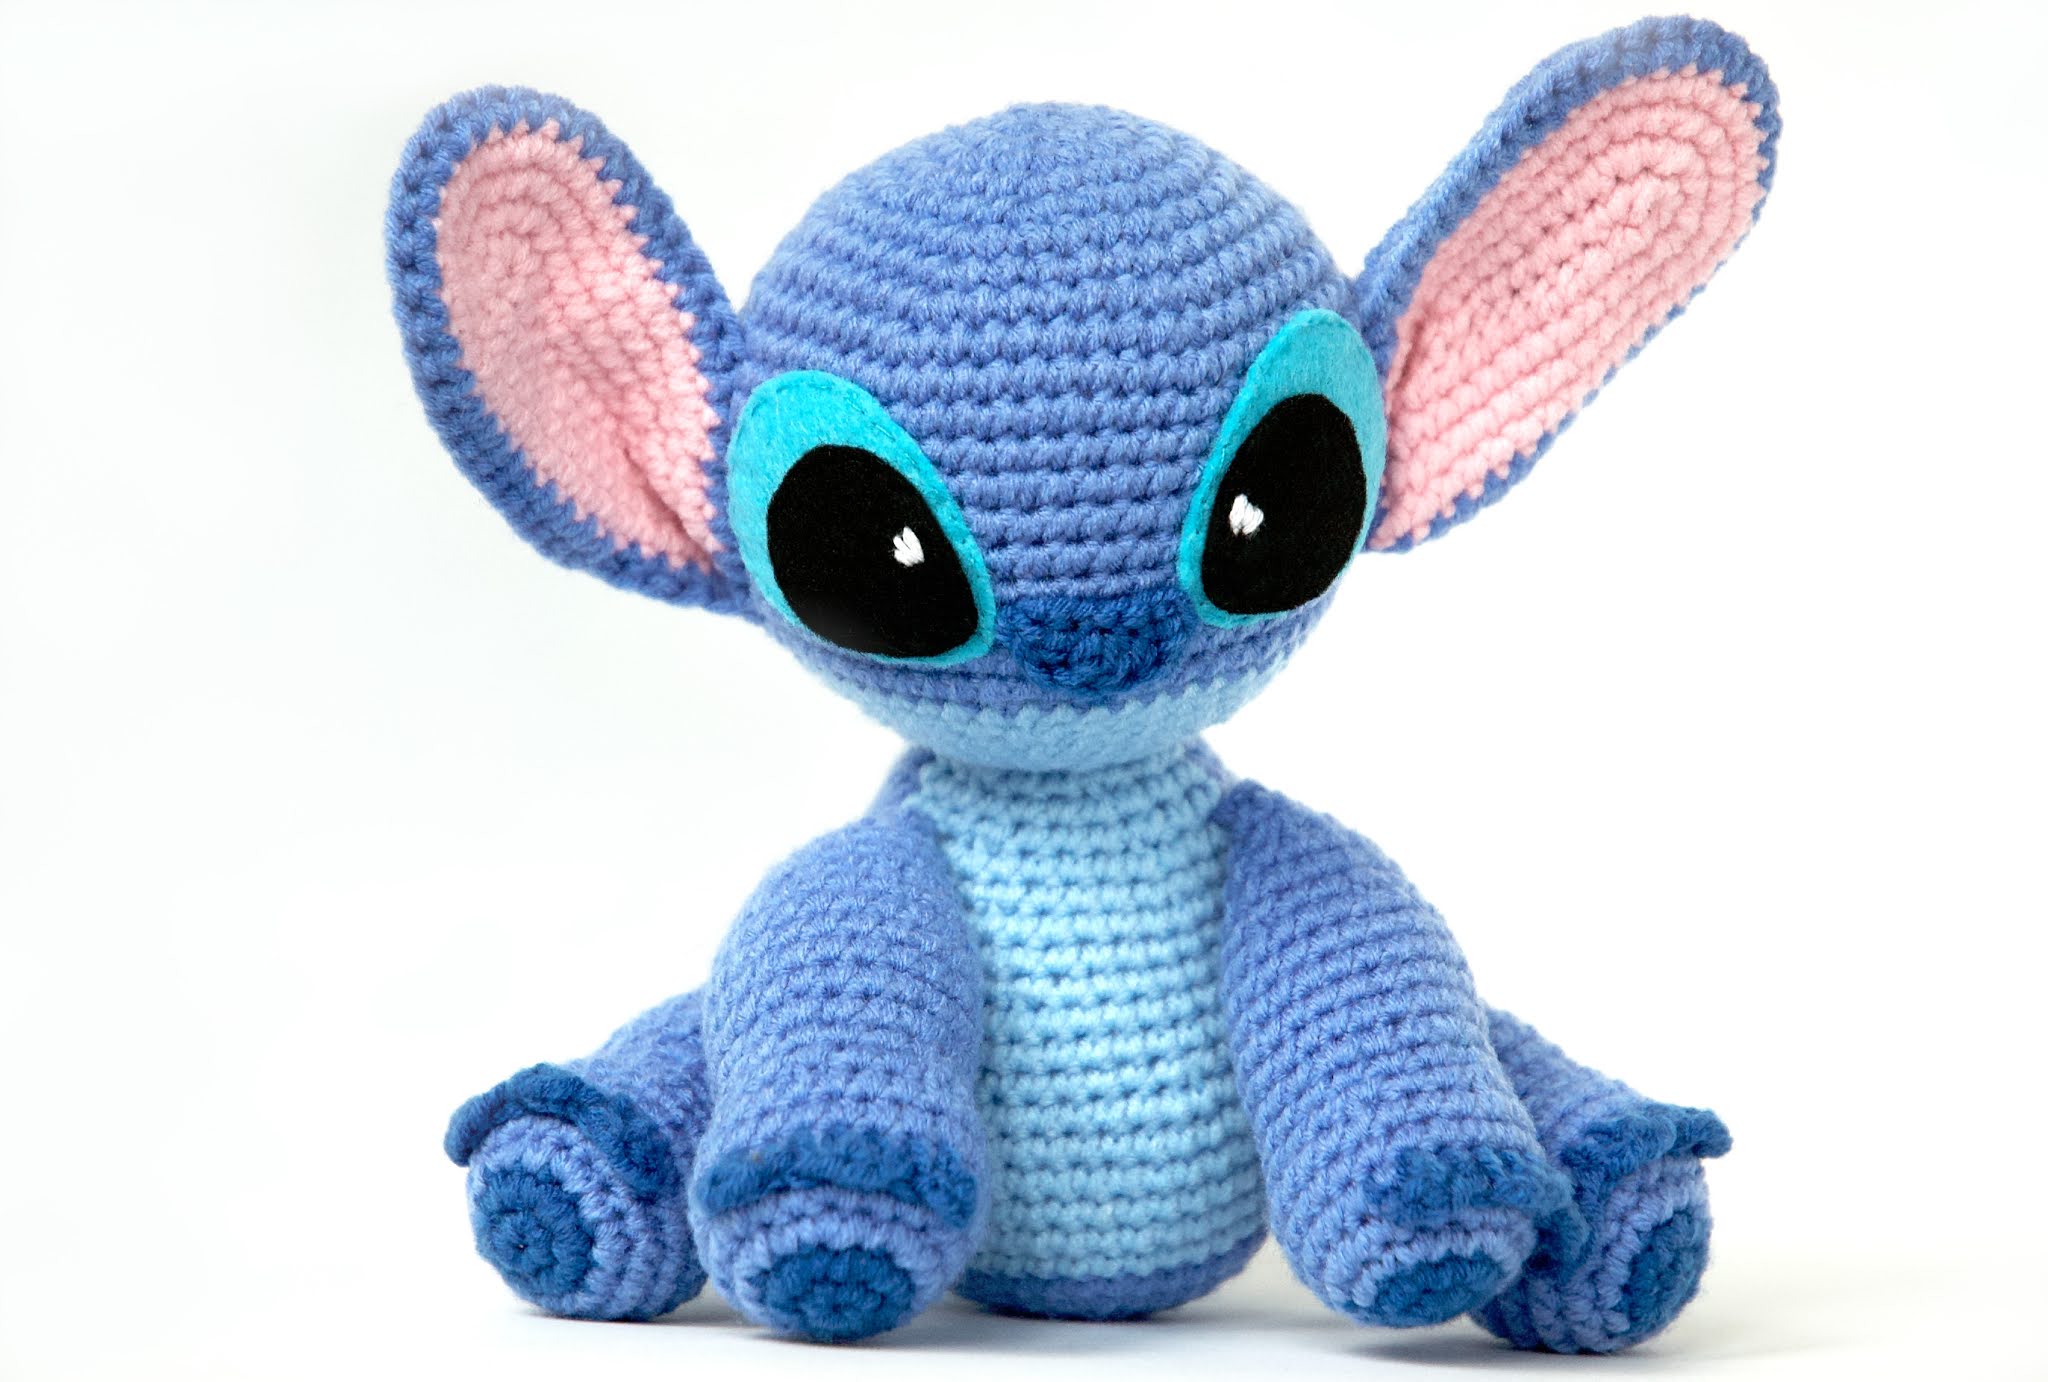
Pusheen-Cat with Donut
Für die DEUTSCHE ANLEITUNG
↓ bitte nach unten scrollen
Русские инструкции
↓пожалуйста, прокрутите вниз
↓VERSIÓN EN ESPAÑOL
Pusheen with Donut(english version in US crochet terms)
by @rxy_crochet
-> Subscribe to my Newsletter to get a FREE premium PDF pattern!
Pusheen with Donut
(english version in US crochet terms)
by @rxy_crochet
-> Subscribe to my Newsletter to get a FREE premium PDF pattern!

For this project you will need:
If you are new to crocheting and don't want to buy everything separately, i recommend to get a crochet Starter Kit with the main tools.
Yarn in the colors: Light grey, dark grey, brown, rosé
Yarn strength: 50 gr/133m, DK, light worsted yarn, number 3
Embroidery thread: black for nose/mouth. Pink, blue and yellow for donut-sprinkles.
Embroidery needle, yarn needle -> i recommend get them in several sizes, with a blunt tip (so you don't split the yarn). You will need them very often in amigurumi: the bigger ones for sewing your pieces together and the smaller ones are perfect for embroidery or sewing smaller pieces.
Safety eyes: size 8 or 9 -> i recommend to get them in a set with different sizes
Crochet Hook: size 4/2.5 mm -> my go to and absolute favourite crochet hooks are these Japanese Tulip Etimo Rose crochet hooks. I use them all the time!
Scissors or cutter -> if you prefer scissors i can really recommend these beautiful high-quality, vintage scissors
Stuffing -> i use this poly-fil stuffing, i recommend getting a larger amount, because in my experience it's used up fairly quickly


Embroidery needle, yarn needle -> i recommend get them in several sizes, with a blunt tip (so you don't split the yarn). You will need them very often in amigurumi: the bigger ones for sewing your pieces together and the smaller ones are perfect for embroidery or sewing smaller pieces.
Safety eyes: size 8 or 9 -> i recommend to get them in a set with different sizes
Crochet Hook: size 4/2.5 mm -> my go to and absolute favourite crochet hooks are these Japanese Tulip Etimo Rose crochet hooks. I use them all the time!
Also, check out these cute stitch markers!
Sewing pins -> i recommend getting a bunch of sewing pins, because they tend to get lost or bend a little bit
Scissors or cutter -> if you prefer scissors i can really recommend these beautiful high-quality, vintage scissors
OR: If you prefer a cutter - like me - i really recommend this quick to grab yarn cutter
Stuffing -> i use this poly-fil stuffing, i recommend getting a larger amount, because in my experience it's used up fairly quickly
If you are new to crochet and don't want to buy everything separately, i can recommend to get a crochet Starter Kit with the main tools.
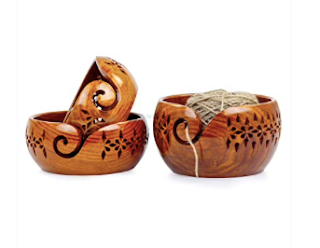
By the way - check out this super practical yarn bowl!
I just got one and it's amazing, it's heavy enough to not move when i pull on the yarn and no more chasing of yarn that's rolling around in my flat.
Get the Mix-It Bundle and save 50%!
Body
With light grey yarn
beginning at the head
beginning at the head
R1: 6 sc in magic ring (6)
R2: 2 sc in each stitch around (12)
R3: (1 sc, inc) x6 (18)
R4: (2 sc, inc) x6 (24)
R5: (sc in next 3 st, inc) x6 (30)
R6: (sc in next 4 st, inc) x6 (36)
R7: (sc in next 5 st, inc) x6 (42)
R9: (sc in next 6 st, inc) x6 (48)
R10-21: (12 rounds) sc in each st (48)
R10-21: (12 rounds) sc in each st (48)
R22: (sc in next 6 st, invdec*) x6 (42)
R23: sc in each st (42)
R24: (sc in next 5 st, invdec) x6 (36)
R25: sc in each st (36)
R26: (sc in next 4 st, invdec) x6 (30)
R27: (sc in next 3 st, invdec) x6 (24)

Add safety eyes size 8 or 9 between row 19 and 20, about 6 stitches apart. Stuff the body.
R28: (sc in next 2 st, invdec) x6 (18)
R29: (sc in next st, invdec) x6 (12)
R30: invdec all around (6)
To close the body go with a sewing needle in the outer loops only (from the inside out) and pull tight. See video below:
Ears (make 2)
R1: 4 sc in magic ring (4)
R2: (1 sc, inc) x2 (6)
R3: (1 sc, inc) x3 (9)
R4: Sc in each st around (9)
Tie off, leave a piece of yarn to sew the ears to the head. Sew ears to the head. Leave enough space between them for the three stripes.
Arms (make 2)
R1: 6 sc in magic ring (6)
R2-3: sc all around (6)
Tie off, leaving a yarn end for sewing on the body later. We first have to sew on the donut.

Legs (make 2)
R1: 6 sc in magic ring (6)
R2: (1 sc, inc) x3 (9)
R2: (1 sc, inc) x3 (9)
R3: Sc all around (9)
Tie off, leaving a yarn end for sewing to the body. Sew the feet onto the body.

The tail is dark grey/light grey striped.
We start with dark grey yarn.
R1: 6 sc in magic ring (6)
R2-3: sc all around (6)
Switch to light grey yarn.
R4-6: 6 sc around (6)
Switch back to dark grey yarn.
R7-9: 6 sc around
Switch back to light grey yarn.
R10-12: 6 sc around
Wooden Yarn Bowl
Tie off leaving a yarn end and sew the tail onto the body so that it goes to one side. See picture:

With dark grey yarn
R2: turn and continue to sc 14 on other side of the chain (14)
Slipstitch in next stitch.
Tie off leaving a yarn end for sewing onto the back. Sew both stripes on the back with a little distance between them as you can see in the picture above.
- There is always a ray of hope! -
Hey everyone! I am happy to introduce my latest pattern to you:
Ray the cute Rainbow!
This pattern is a wonderful idea for everyone who loves colorful, bright and cute things. Ray is also radiating hope in difficult times, so he is perfect to cheer you up or someone who needs a gift. :)
It is a very easy pattern, perfect for beginner crocheters!
You can find the pattern on Ravelry and Etsy

Stripes on head (make 3)
Take a long peace of dark grey yarn.
Take the yarn double, and stitch three long stitches across the head. Go over each stitch two times. Tie off, hide yarn.
Nose/mouth
With black embroidery floss sew on mouth and nose the way you see it in the picture.
The free pattern for the donut by genuinemudpie is not available anymore, but you can google tiny donut crochet pattern for a substitute.
Now sew the donut to the body, then sew on the hands directly next to it.
Congrats! You now have created a pusheen with donut!
Show me your creation by linking me (@rxy_crochet) in your Instagram-picture!
Check out this super practical yarn bowl!
I just got one and it's amazing, it's heavy enough to not move when i pull on the yarn and no more chasing of yarn that's rolling around in my flat.
DEUTSCHE ANLEITUNG

Pusheen mit Donut
kostenlose Fanart Häkelaleitung von @rxy_crochet
Abkürzungen benötigter Techniken
fM – feste Masche
LM - Luftmasche
unsichtbare Abn – 2 fM zusammenhäkeln
(wird im Video unten gezeigt)
Km – Kettmasche
Für dieses Projekt werden benötigt:
Wir beginnen mit dem Körper.


*Unsichtbare Abnahme, siehe video:

Ohren (2x)
R1: 6 feste Maschen in den Fadenring
R2-3: In jede Masche eine feste Masche (6)
R1: 6 feste Maschen in den Fadenring
R2: Jede zweite fM verdoppeln (9)
R3: In jede Masche eine fM (9)
Faden großzügig abschneiden um die Beine anzunähen. Nun die Beine an den Körper nähen.
 Schwanz
Der Schwanz ist dunkelgrau/hellgrau gestreift.
Wir beginnen mit dunkelgrau.
R1: 6 feste Maschen in den Fadenring
R2-3: In jede Masche eine fM (6)
Mit Dunkelgrau
R1: eine feste Masche in die 2. Masche von der Häkelnadel aus, 13 fM häkeln,
R2: Arbeit drehen und 14 fM auf der anderen Seite zurück häkeln (14)
Streifen auf dem Kopf (3x)
Nase/Mund


 Ушки (x2), светло-серый:


Присоедините цвет глазури, разверните работу (теперь вы смотрите на петли не изнутри пончика, а, наоборот, снаружи). Ряд 4: 1 в.п., 12 сс только за ПЕРЕДНИЕ петли, сс в первый стежок ряда (12) – не затягивайте соединительные столбики слишком туго (рис. 3).
Снова поверните работу (вы опять смотрите на петли изнутри пончика).
Ряд 5: 1 в.п., только за ПЕРЕДНИЕ петли: (1 сбн, уб) х 4, сс в первый стежок ряда (8) – не используйте невидимые убавки в этом ряду.
Завершите ряд, обрежьте нить, оставив конец для сшивания.
Пришейте пончик к животу котика, рядом, вплотную к нему, пришейте передние лапки.
Поздравляю, ваш Пушин готов!
Туториал пончика от genuinemudpie можно посмотреть здесь:
VERSIÓN EN ESPAÑOL


Garn in den Farben: Hellgrau, Dunkelgrau, Braun, Rosa
Ich verwende Baumwollgarn in der Stärke: 50 gr/133m
Stickgarn: Schwarz für Nase/Mund. Pink, hellblau und gelb für die Donut-Streusel.
Sicherheitsaugen: Größe 8 oder 9
Häkelnadel: 2,5 mm
Dicke Nadel
Maschenmarkierer
Füllung
Schere
Wir beginnen mit dem Körper.
Körper
Mit hellgrauem Garn
beginnend am Kopf
Runde 1:
Runde 1:
6 feste Maschen in den Fadenring
(6 Maschen), Ring zuziehen
R2: Jede Masche verdoppeln (12)
R3: Jede zweite Masche verdoppeln (18)
R4: Jede dritte Masche verdoppeln (24)
R5: Jede vierte Masche verdoppeln (30)
R6: Jede fünfte Masche verdoppeln (36)
R7: Jede sechste Masche verdoppen (42)
R8: In jede Masche eine feste Masche (42)
R9: Jede siebte Masche verdoppeln (48)
R10-21 (12 Runden): Je Runde 48 feste Maschen (48)
R22: (6 fM, 1 unsichtbare Abn*) x6 (42)
R23: In jede Masche eine fM (42)
R24: (5 fM, 1 unsichtbare Abn) x6 (36)
R25: In jede Masche eine fM (36)
R26: (4 fM, 1 unsichtbare Abn) x6 (30)
R27: (3 fM, 1 unsichtbare Abn) x6 (24)
Nun die Sicherheitsaugen zwischen Reihe 19 und 20, mit einem Abstand von ungefähr 6 Maschen zueinander anbringen. Dann den Körper mit Füllwatte füllen.
R28: (2 fM, unsichtbare Abnahme) x6 (18)
R29: (1 fM, unsichtbare Abnahme) x6 (12)
R30: Jede 1. und 2. Masche zusammenhäkeln (6)
Weitere Anleitungen findest du (alle auch auf Deutsch) bei Ravelry
und Etsy:
*Unsichtbare Abnahme, siehe video:
Um den Körper zu schließen mit der Nadel von innen nach außen in die äußeren Maschenglieder gehen. Dann den Faden festziehen. Siehe Video unten:
Ohren (2x)
R1: 4 feste Maschen in den Fadenring
(4 Maschen), Ring zuziehen
R2: (Jede zweite Masche verdoppeln) x2 (6)
R3: (Jede zweite Masche verdoppeln) x3 (9)
R4: in jede Masche eine fM (9)
Faden großzügig abschneiden um die Ohren anzunähen. Nun die Ohren an den Körper Nähen.
Arme (2x)
R1: 6 feste Maschen in den Fadenring
(6 Maschen), Ring zuziehen
R2-3: In jede Masche eine feste Masche (6)
Faden großzügig abschneiden um später die Arme an den Körper zu nähen. Zuerst wird der Donut angenäht.
Get the Mix-It Bundle and save 50%!
Beine (2x)
R1: 6 feste Maschen in den Fadenring
(6 Maschen), Ring zuziehen
R2: Jede zweite fM verdoppeln (9)
R3: In jede Masche eine fM (9)
Faden großzügig abschneiden um die Beine anzunähen. Nun die Beine an den Körper nähen.
Der Schwanz ist dunkelgrau/hellgrau gestreift.
Wir beginnen mit dunkelgrau.
R1: 6 feste Maschen in den Fadenring
(6 Maschen), Ring zuziehen
R2-3: In jede Masche eine fM (6)
Zu hellgrau wechseln.
R4-6 (3 Runden): In jede Masche eine fM (6)
Zurück zu dunkelgrau wechseln.
R7-9 (3 Runden): In jede Masche eine fM (6)
Zurück zu hellgrau wechseln.
R10-12 (3 Runden): In jede Masche eine fM (6)
Faden großzügig abschneiden um den Schwanz an den Körper annähen, so dass er zur Seite zeigt. Siehe Foto:
Mit Dunkelgrau
15 Luftmaschen häkeln
R1: eine feste Masche in die 2. Masche von der Häkelnadel aus, 13 fM häkeln,
am Ende der Reihe eine LM (14)
R2: Arbeit drehen und 14 fM auf der anderen Seite zurück häkeln (14)
Mit Kettmasche schließen.
Faden großzügig abschneiden um die Streifen anzunähen. Nun die Streifen an den Körper nähen. Dabei einen kleinen Abstand einhalten.
Streifen auf dem Kopf (3x)
Ein langes Stück dunkelgrauen Garn doppelt nehmen und drei lange Stiche über den Kopf häkeln. Dabei über jeden Stich erneut rübergehen. Faden abschneiden und Fadenende verstecken.
Nase/Mund
Mit schwarzem Stickgarn Nase und Mund so wie auf dem Foto aufsticken.
The amazing Halloween Amigurumi Pack is NOW available!
Get 90% off for 5 days only + you get AMAZING BONUSES!
Check it out HERE
Can you guess which design is mine?
Donut:
Die kostenlose Anleitung ist von genuinemudpie, sie ist Hier zu finden.
Nun den Donut vorne an den Körper annähen und die Hände direkt daneben annähen.
Zeig mir deine Kreation indem zu mich (@rxy_crochet) in deinem Instagram-Foto verlinkst!Ich freue mich sehr, dass dir meine Anleitung gefällt!
Um noch mehr kostenlose Anleitungen zu schreiben,
werde ich viel Kaffee brauchen! :D
Möchtest du meine Arbeit unterstützen?
Hier kannst du mir einen Kaffee ausgeben:


Vielen Dank! Deine Unterstützung bedeutet mir wirklich viel! <3
Русские инструкции
Кот Пушин с пончиком
Автор: @rxy_crochet
Перевод: @polar_made
Сокращения:
КА - кольцо амигуруми
в.п. - воздушная петля
сбн - столбик без накида
пр - прибавка
уб - убавка
сс - соединительный столбик
Тело (начинается с головы), светло-серый:
Ряд 1: 6 сбн в КА (6)
Ряд 2: 6 пр (12)
Ряд 3: (1 сбн, пр) x 6 (18)
Ряд 4: (2 сбн, пр) x 6 (24)
Ряд 5: (3 сбн, пр) x 6 (30)
Ряд 6: (4 сбн, пр) x 6 (36)
Ряд 7: (5 сбн, пр) x 6 (42)
Ряд 8: 42 сбн (42)
Ряд 9: (6 сбн, пр) x 6 (48)
Ряд 10-21: 48 сбн (48)
Ряд 22: (6 сбн, уб) x 6 (42)
Ряд 23: 42 сбн (42)
Ряд 24: (5 сбн, уб) x 6 (36)
Ряд 25: 36 сбн (36)
Ряд 26: (4 сбн, уб) x 6 (30)
Ряд 27: (3 сбн, уб) x 6 (24)
Вставьте безопасные глазки между 19 и 20 рядами на расстоянии 6 сбн друг от друга. Набейте тело.
Ряд 28: (2 сбн, уб) x 6 (18)
Ряд 29: (1 сбн, уб) x 6 (12)
Ряд 30: 6 уб (6)
Закройте оставшиеся петли при помощи иглы, закрепите и обрежьте нить и спрячьте хвостик.
Ряд 1: 4 сбн в КА (4)
Ряд 2: (1 сбн, пр) x 2 (6)
Ряд 3: (1 сбн, пр) x 3 (9)
Ряд 4: 9 сбн (9)
Закрепите и обрежьте нить, оставьте конец для пришивания. Пришейте ушки к голове (между ними должно оставаться место, чтобы вышить полоски).
Ряд 2: (1 сбн, пр) x 2 (6)
Ряд 3: (1 сбн, пр) x 3 (9)
Ряд 4: 9 сбн (9)
Закрепите и обрежьте нить, оставьте конец для пришивания. Пришейте ушки к голове (между ними должно оставаться место, чтобы вышить полоски).
Передние лапки (х2), светло-серый:
Ряд 1: 6 сбн в КА (6)
Ряд 2-3: 6 сбн (6)
Закрепите и обрежьте нить, оставьте конец для пришивания. Пока не пришивайте лапки к телу.
Ряд 1: 6 сбн в КА (6)
Ряд 2-3: 6 сбн (6)
Закрепите и обрежьте нить, оставьте конец для пришивания. Пока не пришивайте лапки к телу.
Задние лапки (х2), светло-серый:
Ряд 1: 6 сбн в КА (6)
Ряд 2: (1 сбн, пр) x 3 (9)
Ряд 3: 9 сбн (9)
Закрепите и обрежьте нить, оставьте конец для пришивания. Пришейте задние лапки к телу.
Ряд 1: 6 сбн в КА (6)
Ряд 2: (1 сбн, пр) x 3 (9)
Ряд 3: 9 сбн (9)
Закрепите и обрежьте нить, оставьте конец для пришивания. Пришейте задние лапки к телу.
Хвост, начинается с темно-серого цвета:
Ряд 1: 6 сбн в КА (6)
Ряд 2-3: 6 сбн (6)
Смена цвета на светло-серый
Ряд 4-6: 6 сбн (6)
Смена цвета на темно-серый
Ряд 7-9: 6 сбн (6)
Смена цвета на светло-серый
Ряд 10-12: 6 сбн (6)
Закрепите и обрежьте нить, оставьте конец для пришивания. Пришейте хвост к телу, как показано на фото.
Ряд 1: 6 сбн в КА (6)
Ряд 2-3: 6 сбн (6)
Смена цвета на светло-серый
Ряд 4-6: 6 сбн (6)
Смена цвета на темно-серый
Ряд 7-9: 6 сбн (6)
Смена цвета на светло-серый
Ряд 10-12: 6 сбн (6)
Закрепите и обрежьте нить, оставьте конец для пришивания. Пришейте хвост к телу, как показано на фото.
Полоски на спине (х2), темно-серый:
Наберите цепочку из 15 в.п.
Ряд 1: сбн во вторую от крючка петлю, 13 сбн, 1 в.п. (14)
Ряд 2: 14 сбн по другой стороне цепочки (14), сс
Закрепите и обрежьте нить, оставьте конец для пришивания. Пришейте обе полоски к телу, как показано на фото.
Наберите цепочку из 15 в.п.
Ряд 1: сбн во вторую от крючка петлю, 13 сбн, 1 в.п. (14)
Ряд 2: 14 сбн по другой стороне цепочки (14), сс
Закрепите и обрежьте нить, оставьте конец для пришивания. Пришейте обе полоски к телу, как показано на фото.
Полоски на голове (х3)
Возьмите длинный отрезок темно-серой пряжи, сложите в два раза и вышейте на голове котика три полоски. Повторите ещё раз поверх уже вышитых стежков, чтобы полоски были объемными. Закрепите нить, спрячьте хвостик.
Чёрным цветом вышейте мордочку, на показано на фото.
Возьмите длинный отрезок темно-серой пряжи, сложите в два раза и вышейте на голове котика три полоски. Повторите ещё раз поверх уже вышитых стежков, чтобы полоски были объемными. Закрепите нить, спрячьте хвостик.
Чёрным цветом вышейте мордочку, на показано на фото.
Пончик
Коричневый цвет
Ряд 1: 8 в.п., сс в первую петлю, чтобы замкнуть кольцо
Ряд 2: 1 в.п., (1 сбн, пр) х 4, сс в первый стежок ряда (12)
Ряд 3: 1 в.п., 12 сбн, сс в первый стежок ряда (12)
Обратите внимание, что наружная сторона пончика образована изнаночной стороной петель (рис.1-2).
Коричневый цвет
Ряд 1: 8 в.п., сс в первую петлю, чтобы замкнуть кольцо
Ряд 2: 1 в.п., (1 сбн, пр) х 4, сс в первый стежок ряда (12)
Ряд 3: 1 в.п., 12 сбн, сс в первый стежок ряда (12)
Обратите внимание, что наружная сторона пончика образована изнаночной стороной петель (рис.1-2).
Присоедините цвет глазури, разверните работу (теперь вы смотрите на петли не изнутри пончика, а, наоборот, снаружи). Ряд 4: 1 в.п., 12 сс только за ПЕРЕДНИЕ петли, сс в первый стежок ряда (12) – не затягивайте соединительные столбики слишком туго (рис. 3).
Снова поверните работу (вы опять смотрите на петли изнутри пончика).
Ряд 5: 1 в.п., только за ПЕРЕДНИЕ петли: (1 сбн, уб) х 4, сс в первый стежок ряда (8) – не используйте невидимые убавки в этом ряду.
Завершите ряд, обрежьте нить, оставив конец для сшивания.
Сшейте первый и последний ряды пончика стежком «через край», совмещая петли рядов (рис.4). Зафиксируйте все концы нитей и спрячьте их внутри. Набивать пончик не нужно. Вышейте посыпку разноцветными нитками.
Пришейте пончик к животу котика, рядом, вплотную к нему, пришейте передние лапки.
Поздравляю, ваш Пушин готов!
Туториал пончика от genuinemudpie можно посмотреть здесь:
Pusheen con Donut
Por @rxy_crochet
PUSHEEN CON DONUT
(Versión española con terminología USA)
Por @rxy_crochet
Para este proyecto, necesitarás:
- Lana de color gris claro, gris oscuro, marrón, rosa clarito.
- Tipo de hilo: 50 gr/133 m. fino (nota: un light worsted yarn vendría a ser una lana/algodón fino, tipo 8/6, para trabajar con ganchillo 2,5-3 mm aprox).
- Hilo de bordar; negro para la nariz y la boca. Rosa, azul y amarillo para los fideos del donut.
- Ojos de seguridad, de 8 o 9 mm.
- Ganchillo 2,5 mm. (talla 4 en USA terminología)
- Marcadores de colores
- Aguja lanera
- Tijeras
- Relleno
Subscribe to my Newsletter to get a FREE premium PDF pattern!
Terminología:
Pb : punto bajo
Pd: punto deslizado / punto enano.
Aum: aumento
Dism: disminución (aconsejable, utilizar la disminución invisible, para que quede más pulido. Puedes ver el video en
Comencemos por el cuerpo.
Cuerpo
Con lana gris claro, comenzando en la cabeza.
V1- Anillo mágico de 6 pb (6)
V2- 6 aum. (dos pb en cada punto) (12)
V3- (1 pb, 1 aum) x 6 (18)
V4- (2 pb, 1 aum) x 6 (24)
V5- (3 pb, 1 aum) x 6 (30)
V6- (4 pb, 1 aum) x 6 (36)
V7- (5 pb, 1 aum) x 6 (42)
V8- 42 pb (42)
V9 – (6 pb, 1 aum) x 6 (48)
V10-21- (12 vueltas) 48 pb (48)
V22- (6 pb, 1 dism) x 6 (42)
V23- 42 pb (42)
V24- (5 pb, 1 dism) x 6 (36)
V25- 36 pb (36)
V26- (4 pb, 1 dism) x 6 (30)
V27- (3 pb, 1 dism) x 6 (24)
Coloca los ojos de seguridad de tamaño 8 o 9 entre las vueltas 19 y 20, separados por 6 puntos. Rellena el cuerpo.
V28- (2 pb, 1 dism) x 6 (18)
V29- (1 pb, 1 dism) x 6 (12)
V30- 6 disminuciones (6)
Para cerrar el cuerpo, utiliza una aguja de coser cogiendo sólo los anillos exteriores (de dentro afuera) y estíralo para quede bien cerrado. Puedes verlo en el video:
Orejas (hacer 2)
V1- Anillo mágico de 4 pb (4)
V2- (1 pb, 1 aum) x 2 (6)
V3- (1 pb, 1 aum) x 3 (9)
V4- 9 pb (9)
Cierra y deja una hebra de hilo para coserlas a la cabeza. Al coserlas, deja suficiente espacio entre ellas para las tres rayas de la cabeza)
Brazos (hacer 2)
V1- Anillo mágico de 6 pb (6)
V2-3- 6 pb en cada vuelta (6)
Cierra y deja hebra de hilo para coserlos al cuerpo. Antes de coserlas al cuerpo, tenemos que coserlas en el donut.
Piernas (hacer 2)
V1- Anillo mágico de 6 pb (6)
V2- (1 pb, 1 aum) x 3 (9)
V3- 9 pb (9)
Cierra y deja hebra de hilo para coser al cuerpo.
Cola
La cola es a rayas gris claro / gris oscuro.
Comenzamos con el gris oscuro.
V1- Anillo mágico de 6 pb (6)
V2-3- 6 pb (6)
Cambiar a gris claro
V4-6- 6 pb (6)
Cambiar a gris oscuro
V7-9- 6 pb (6)
Cambiar a gris claro
V10-12- 6 pb (6)
Cierra y deja una hebra de hilo para coser la cola al cuerpo.
Rayas de la espalda (hacer 2)
Con gris oscuro
Montar 15 cadenetas
V1- Tejer desde segunda cadeneta, 14 pb, 1 cad. (14)
V2- Girar y continuar por el otro lado de la cadeneta, 14 pb (14)
Cerrar con un punto deslizado en el siguiente punto y dejar hebra para coserlas a la espalda. Puedes ver la distancia a dejar entre ellas en la foto de arriba.
Rayas en la cabeza (hacer 3)
Enhebra una hebra bastante larga de gris oscuro. Se cose con hebra doble. Cose tres largas puntadas cruzando la cabeza, dos veces por cada raya. Cierra y esconde la hebra.
Nariz/boca
Con hilo de bordar negro, cose la boca y la nariz como puedes ver en la foto.
Donut
El donut está hecho siguiendo el patrón gratuito de genuinemudpie, que puedes encontrar aquí: Patrón Donut
¡Felicidades! Ya has creado un pusheen con donut!
¡Muéstrame tu creación enlazándome (@rxy_crochet) en tu foto de Instagram!
