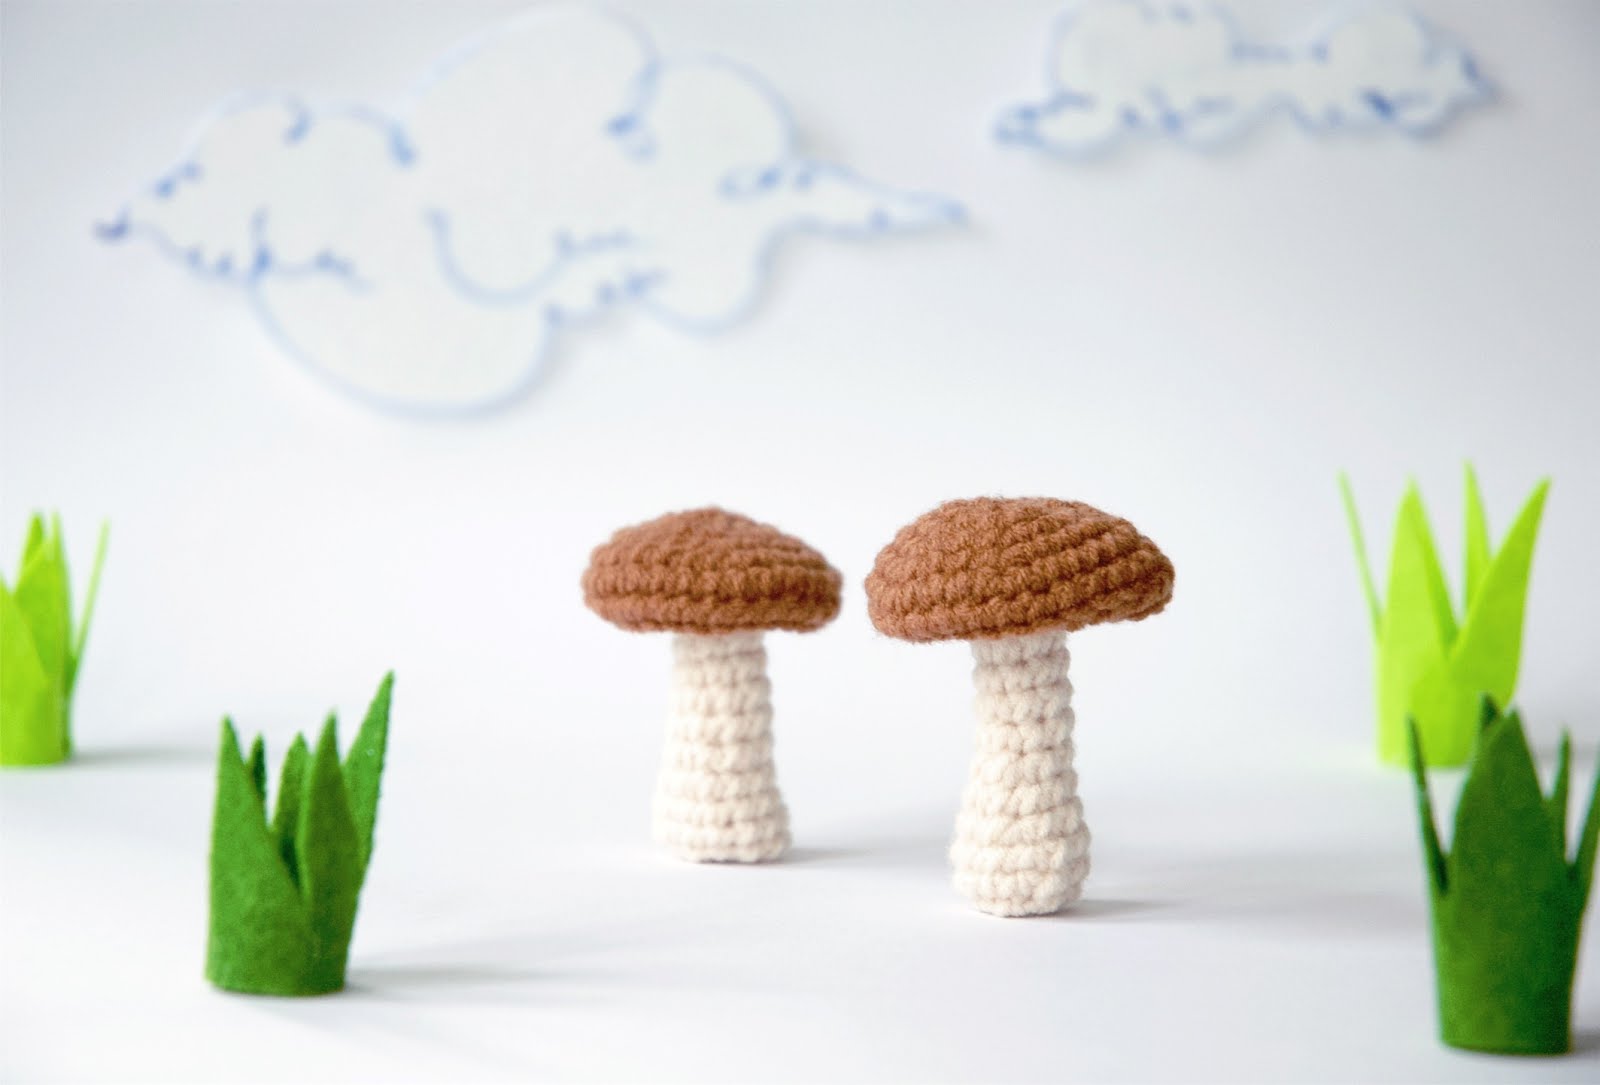
Brown Mushrooms
english version in US crochet terms
für die DEUTSCHE ANLEITUNG↓bitte nach unten scrollen
VERSiOn en ESPANOL ↓
VERSiOn en ESPANOL ↓

If you are new to crocheting and don't want to buy everything separately, i recommend to get a crochet Starter Kit with the main tools.
Yarn in the colors: Medium dark brown, powder-white or beige.
Fly agaric mushroom:
Yarn in the colors: Red, white
Yarn strength: 50 gr/133m, DK light-worsted yarn, number 3 -> i used Milk Cotton Yarn
Yarn in the colors: Medium dark brown, powder-white or beige.
Fly agaric mushroom:
Yarn in the colors: Red, white
Yarn strength: 50 gr/133m, DK light-worsted yarn, number 3 -> i used Milk Cotton Yarn
Crochet Hook: size 4/2.5 mm -> my go to and absolute favourite crochet hooks are these Japanese Tulip Etimo Rose crochet hooks. I use them all the time!
Yarn Needle -> i recommend get them in several sizes, with a blunt tip (so you don't split the yarn). You will need them very often in amigurumi: the bigger ones for sewing your pieces together and the smaller ones are perfect for embroidery or sewing smaller pieces.
Scissors or cutter -> if you prefer scissors i can really recommend these beautiful
high-quality, vintage scissors


Stitch Markers -> i use these
OR: If you prefer a cutter - like me - i really recommend this quick to grab yarn cutter
Get the Mix-It Bundle and save 50%!
Stitch Markers -> i use these
Stuffing -> i use this poly-fil stuffing, i recommend getting a larger amount, because in my experience it's used up fairly quickly
These pretty mushroom make a great decoration. For autumn or for forest-decorations for example. I will definitely use them in the photo-background of my next amigurumis. I am already working on some more mushrooms. I want to make them in intense vibrant colors, magic mushrooms, so to say.
Nature has so much beauty in store! I got my inspiration from the beautiful mushroom-photos on Pinterest. Did you know that some mushrooms even glow in the dark? They are called bio-luminescent mushrooms. Really fascinating!
Also if you are interested in what else mushrooms can do, i recommend watching some videos of Paul Stamets. He is an absolute mushroom-enthusiast and expert! He also developed a bee-feeding-device that is based on mushrooms, which heals the bees from a virus they have. Thanks to him the bees also get important nutrients and energy to survive.
He also talks about mushrooms functioning as the immune-system of the planet. They have the ability to fight viruses etc. Especially now, with the current situation, this ability is more relevant than ever!
Again: i really recommend checking Paul Stamets out on Youtube, there is so much to learn from him about the amazing world we live in an it's fascinating organisms.
Get the Mix-It Bundle and save 50%!
Pattern
Variations
If you make several mushrooms, you can stuff some of them, and leave some of them unstuffed. So they vary in form as they do in nature. Also you can vary the length of the stem by crocheting more or less than 5 rounds after R12.
Fly agaric:
Turn these mushrooms into fly agaric mushrooms by changing the color brown into red and using a cleaner white for the stem. Embroider some white spots on top.
Fly agaric:
Turn these mushrooms into fly agaric mushrooms by changing the color brown into red and using a cleaner white for the stem. Embroider some white spots on top.

Oh Fall - you are the cosiest time of the year!
You smell like wet leaves on the ground.
You feel like long walks on Sundays.
You look like red, yellow and orange trees glowing in the sun.
You taste like hot chocolate and pumpkin pie.
You are soft like thick socks and warm blankets on the couch
You call for watching all Seasons of Gilmore Girls again.
Oh Fall - you are my favourite time of the year!


Cap
We start with brown/red yarn.
Leave a little bit longer beginning tail.
R1: 6 sc in magic ring (6)
Make sure to place a stitch marker at the end of every round!
Make sure to place a stitch marker at the end of every round!
R2: 2 sc in each stitch around (12)
R3: (1 sc, inc) x6 (18)
R4: (2 sc, inc) x6 (24)
R5: (sc in next 3 st, inc) x6 (30)
R6-7: sc all around (30)
Now we will make a color-change to powder-white/white.
R8: In BLO, pull up a loop of powder-white yarn, and pull through to finish the sc.
(sc 3, invdec*) x6 (24)
R9: in both loops with powder-white:
(sc 2, invdec) x6 (18)
Now stuff the cap lightly if you want. I didn’t stuff mine.
If you don’t want to stuff the mushroom, continue with R10.
R10: (1 sc, dec) x6 (12)
*invisible decrease: see video on bottom of post.
Note: You now can continue without sewing, but note that the stem can then be pulled out a bit.
New pattern release/Meine neue Anleitung:
Coco & Chanel the Cats

Sewing cap together (if not stuffed):
Take the beginning- piece of brown/red yarn and go in BLO of the last round with a sewing needle and sew the back loops to the top of the mushroom. Don’t sew to tight, to not deform the mushroom. Go with the direction of stitches on the top.

Stem
R12: (in FLO: 1 sc, invdec) x4 (8)
R13-17 (5 rounds):
in both loops: sc all around (8)
R18: (2 sc, inc) x2, 2 sc (10)
R19: sc around (10)
R20: (3 sc, inc) x2, 2sc (12)
R21: (3 sc, inc) x3 (15)
R22: sc around (15)
R23: (2 sc, invdec) x4 (12)
Stuff the stem now.
R24: invdec 4 times (7)
With a needle go into the outer loops from inside out (see video below) and pull tight, hide yarn end.
Congratulations! You now have created a beautiful mushroom!
I hope you enjoyed this pattern!
Show me your creation by linking me (@rxy_crochet) in your Instagram-picture.
Invisible decrease
How to make the invisible decrease, see video below:
Check out my other patterns on Ravelry

and Etsy:

This crochet pattern, as well as all images and text contained herein are copyrighted by Roxy's Crochet. Please, don't copy, sell, reproduce, or distribute them in any way to any other person or entity, or post on any website without linking to this blog. You can sell the final product or products created from this crochet pattern in accordance with your state and local laws, with the exception of mass production. Then also i would be happy if you give credit to me as the designer.
Oh Fall - you are the cosiest time of the year!
You smell like wet leaves on the ground.
You feel like long walks on Sundays.
You look like red, yellow and orange trees glowing in the sun.
You taste like hot chocolate and pumpkin pie.
You are soft like thick socks and warm blankets on the couch
You call for watching all Seasons of Gilmore Girls again.
Oh Fall - you are my favourite time of the year!
You smell like wet leaves on the ground.
You feel like long walks on Sundays.
You look like red, yellow and orange trees glowing in the sun.
You taste like hot chocolate and pumpkin pie.
You are soft like thick socks and warm blankets on the couch
You call for watching all Seasons of Gilmore Girls again.
Oh Fall - you are my favourite time of the year!
Braune Pilze/Fliegenpilz
von @rxy_crochet
DEUTSCHE ANLEITUNG
FM | Feste Masche |
LM | Luftmasche |
KM | Kettmasche |
Zun. | Zunahme |
uns. Abn. | Unsichtbare Abnahme |
nur hMg nur vMg | Nur ins hintere Maschenglied Nur ins vordere Maschenglied |
R (Nummer) | Runde/n (Nummer) |
(Nummer) | Maschenanzahl der Runde |
New pattern release/Meine neue Anleitung:
Coco & Chanel the Cats
Für dieses Projekt wird benötigt:
Garn in den Farben: Braun/Rot, Puderweiß/Weiß
Ich verwende Baumwollgarn in der Stärke: 50 gr/133m
Häkelnadel: 2,5 mm
Dicke Nadel
Maschenmarkierer
Füllung
Schere
Variationen
Wenn mehrere Pilze gehäkelt werden, können einige der Hauben gefüllt werden und einige davon nicht. Sie unterscheiden sich dann ein wenig in ihrer Form wie in der Natur. Auch die Länge des Stiels kann variiert werden, indem mehr oder weniger als 5 Runden nach R12 gehäkelt werden.
Fliegenpilz:
Diese Pilze können auch als Fliegenpilze gehäkelt werden, indem die Farbe Braun mit Rot ersetzt und ein helleres Weiß für den Stiel verwendet wird. Dann noch ein paar weiße Flecken darauf sticken.

Haube
Wir beginnen mit braunem bzw. rotem Garn.
Zu Beginn ein etwas längeres Garnende stehen lassen.
R1: 6 feste Maschen in den Fadenring
(6 Maschen), Ring zuziehen
R 2: Jede Masche verdoppeln (12)
R 3: Jede zweite Masche verdoppeln (18)
R 4: Jede dritte Masche verdoppeln (24)
R 5: Jede vierte Masche verdoppeln (30)
R6-7: In jede Masche eine feste Masche (30)
Nun machen wir einen Farbwechsel zu puderweiß bzw. weiß.
R8: Nur in hMg, den weißen Faden aufnehmen und eine feste Masche häkeln. (3 FM, 1 uns. Abn*) x6 (24)
R9: In beide Maschenglieder mit weißem Garn:
(2 FM, 1 uns. Abn.) x6 (18)
Nun die Haube leicht füllen, dies ist optional. Ich habe meine nicht gefüllt.
R10: (1 FM, uns. Abn.) x6 (12)
*unsichtbare Abnahme: siehe Video unten.
Notiz: Die Haube muss nicht angenäht werden, doch dann kann der Stiel etwas herausgezogen werden.
Festnähen der Haube (nur, wenn nicht gefüllt):
Mit einer stumpfen Nadel und dem Anfangsstück Garn nur ins hMg der letzten Runde gehen. Die hinteren Maschenglieder an die Haube nähen. Dabei nicht zu eng nähen, um den Pilz nicht zu deformieren. Zudem mit der Richtung der Stiche auf der Haube gehen.

Stiel
R12: (in vMg: 1 FM, uns. Abn.) x4 (8)
R13-17 (5 Runden): In beide Maschenglieder: In jede Masche eine feste Masche (8)
R18: (2 FM, Zun.) x2, 2 FM (10)
R19: In jede Masche eine feste Masche (10)
R20: (3 FM, Zun.) x2, 2 FM (12)
R21: (3 FM, Zun.) x3 (15)
R22: In jede Masche eine feste Masche (15)
R23: (2 FM, uns. Abn.) x4 (12)
Nun den Stiel füllen.
R24: (Uns. Abn.) x4 (7)
Mit der Nadel in die äußeren Maschenglieder von innen heraus gehen. Dann den Faden festziehen um die letzte Runde zu schließen. Siehe Video:
Beim Fliegenpilz nun noch weiße Punkte aufsticken.
Beim Fliegenpilz nun noch weiße Punkte aufsticken.
Herzlichen Glückwunsch! Du hast einen wunderschönen Pilz geschaffen!
Ich hoffe dir hat diese Anleitung gefallen!
Zeig mir deine Kreation, indem du mich (@rxy_crochet) in deinem Instagram-Bild verlinkst!
Weitere Anleitungen findest du (alle auch auf Deutsch) auf Ravelry
und Etsy:
BITTE BEACHTEN
Dieses Häkelmuster sowie alle hierin enthaltenen Bilder und Texte sind durch Roxy's Crochet urheberrechtlich geschützt. Bitte kopieren, verkaufen, reproduzieren oder verteilen Sie diese in keiner Weise an andere Personen oder Organisationen und veröffentlichen Sie sie nicht auf Websites, ohne auf diesen Blog zu verlinken. Sie können das Endprodukt oder die Produkte, die aus diesem Häkelmuster hergestellt wurden, gemäß Ihren staatlichen und lokalen Gesetzen verkaufen, mit Ausnahme der Massenproduktion. Auch dann würde ich mich freuen, wenn Sie mich als Designer nennen.
Abreviaturas
pto pr | Punto Punto raso/punto enano |
pb pp | Punto bajo Punto piña de puntos altos |
aum dis dis. inv. | Aumento Disminución Disminución invisible |
SHT | Sólo hebra trasera |
V (x) | Número de vuelta (x) |
(número) | Número de puntos en la vuelta |
Materiales
Lana de los siguientes colores: Marrón y blanco crema/beige
Amanita muscaria:
Materiales
Lana de los siguientes colores: Rojo y blanco
Grosor de lana: número 3
Alfileres
Marcador de puntos
Ojos de seguridad: 9mm
Aguja de ganchillo: 2.5 mm y 4 mm
Aguja lanera
Tijeras
Relleno
Oh Fall - you are the cosiest time of the year!
You smell like wet leaves on the ground.
You feel like long walks on Sundays.
You look like red, yellow and orange trees glowing in the sun.
You taste like hot chocolate and pumpkin pie.
You are soft like thick socks and warm blankets on the couch
You call for watching all Seasons of Gilmore Girls again.
Oh Fall - you are my favourite time of the year!
You smell like wet leaves on the ground.
You feel like long walks on Sundays.
You look like red, yellow and orange trees glowing in the sun.
You taste like hot chocolate and pumpkin pie.
You are soft like thick socks and warm blankets on the couch
You call for watching all Seasons of Gilmore Girls again.
Oh Fall - you are my favourite time of the year!
Estas setas son una gran decoración, por ejemplo para decoraciones tipo bosque. Definitivamente las usaré como fondo de las fotos de mis próximos amigurumis. Ya estoy trabajando en otras setas. Quiero hacerlas en colores brillantes, setas mágicas por decirlo así…
¡La naturaleza tiene tanta belleza!. Me inspiro de las fotos tan maravillosas que hay en Pinterest. ¿Sabías que hay setas que incluso brillan en la oscuridad?, son las setas bioluminiscentes. ¡Realmente fascinante!
Si te interesa que más pueden hacer las setas te recomiendo que veas los videos de Paul Stamets. ¡Es un experto y entusiasta de las setas!. También ha desarrollado un dispositivo de alimentación de abejas basado en las setas, que curan a las abejas de un virus que estas pueden tener. Gracias a esto, las abejas también tienen importantes nutrientes y energía para sobrevivir.
También habla sobre las setas que funcionan como el sistema inmune del planeta, ya que tienen la habilidad de luchar contra virus. Especialmente ahora, con la situación actual, esto es más importante que nunca!
De nuevo: te recomiendo revisar a Paul Stamets en Youtube, hay mucho que aprender de él sobre el mundo en el que vivimos y sus fascinantes organismos.
Patrón
Variaciones à Si haces varias setas puedes rellenar sólo algunas y dejar otras sin rellenar; de esta manera su forma será diferente, tal y como pasa en la naturaleza. También puedes variar la longitud del tallo haciendo más o menos de 5 vueltas después de la vuelta 12.

Check out my other patterns on Ravelry
and Etsy:
Amanita muscaria:
Convierte estos champiñones en Amanita muscaria cambiando el color marrón por rojo, y usando un blanco más claro para el tallo. Borda puntos blancos en la parte superior.
Gorro (parte superior)
Empezar con lana marrón/roja.
Dejar una hebra al empezar.
V1: Anillo mágico de 6 pb (6)
V2: 6 aum (12)
V2: 6 aum (12)
V3: (1 pb, aum) x6 (18)
V4: (2 pb, aum) x6 (24)
V5: (3 pb, aum) x6 (30)
V6-7: pb en pb (30)
Cambiar a color beige/blanco
V8: SHT, (3 pb, dism. inv) x6 (24)
R9: (2 pb, dis. Inv.) x6 (18)
Rellena el “gorro” un poco si quieres. Yo no rellené el mío. Si no quieres rellenar la seta, continúa con la V10
V10: (1 pb, dis. Inv.) x6 (12)
Nota: Puedes continuar sin coser , pero ten en cuenta que el tallo se puede salir un poco.
Coser el gorro junto (si no se ha rellenado):
Tomar el principio de la pieza marrón/roja y hacer en SHT la última vuelta con una aguja de coser, cosiendo los bucles traseros a la parte de arriba de la seta. No coser demasiado apretado, para no deformar la seta. Seguir la dirección de las puntadas de la parte superior.
Tallo
V12: SHT (1 pb, dism. inv.) x4 (8)
V13-17 (5 vueltas): pb alrededor (8)
V18: (2 pb, aum) x2, 2 pb (10)
V19: pb alrededor (10)
V20: (3 pb, aum) x2, 2 pb (12)
V21: (3 pb, aum) x3 (15)
V22: pb alrededor (15)
V23: (2 pb, dism. inv.) x4 (12). Rellenar el tallo ahora
V24: 4 dism. inv. (7)
Con la aguja lanera tomar el bucle exterior y apretar. Ocultar el hilo.
¡Felicidades! Ya has creado una seta preciosa
Enséñame tus creaciones etiquetándome (@rxy_crochet) en tus fotos de Instagram.
¡Por favor, leer!!!
Este patron de ganchillo, todas las imágenes y el texto son propiedad de Roxy's Crochet. Por favor, no copie, venda, reproduzca o distribuya a ninguna persona o entidad; tampoco publique en ninguna página web sin usar un vínculo a este blog. Puedes vender el producto final o productos creados a partir de este patrón de acuerdo con las leyes locales. ¡También me gustará que me etiquetes como la diseñadora!
